

I’ve always liked the idea of permanently mounted outdoor cameras, but I was put off by the thoughts (or, alternatively, costs) of running wiring to each camera. Battery operated Wi-Fi cameras addressed some of these problems, but left the issue of accessibility: mounting them low enough to change the battery easily left them vulnerable to theft or vandalism. They also ruled out the possibility of continuous recording, as that would drain the battery in no time. I had considered mounting them just under an upstairs window, which might have been a solution. I think I had an issue with the home station as well, but as that’s a year ago, I don’t recall what it was.
In any case, I ended up investing about $90 CDN in two Wyze v3 cameras. This was cheap enough that I could learn about running a camera and if worst came to worst, treat the whole thing as an entertainment expense. It’s been about 11 months since we got them and I’d say there has been at least that amount of entertainment value.
In this post I’m going to share my thoughts and experiences in locating and then physically installing two cameras, first temporarily, and then permanently. This should give you some ideas for your situation.
Power
The hardest condition to fulfil is proximity to electricity. Ideally, the camera would be located within three feet of a nice dry power socket. Within reason, power can be brought closer with an extension cord, or the three foot USB cable can be replaced with a longer one. I have tried all of these.
Temporary installation
Given that we didn’t know anything about these things, I didn’t want to start with drilling a hole through the brickwork in my house. We wanted a camera which would cover the approach to our front door and the doorstep. This way we could see if there was someone at the door or a parcel left at the door. I’d heard that some cameras disappeared, so I didn’t want it too low. Above the garage door seemed good. With a 110° field of view, putting the camera near the side of the driveway furthest from the front door would fit what we wanted.
The camera comes with a mount that lets you point the camera in almost any direction and luckily we have an outdoor plug in the fascia under the garage roof just around the corner from the door. The camera comes with a 3’ USB cord, so that determined where the camera could go. As luck would have it, the brickwork on the front of our garage has the mortar joints raked out to leave about a ½” deep and wide gap between bricks.
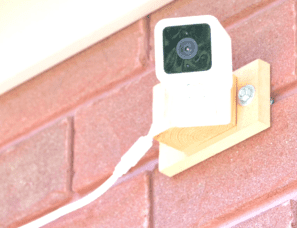
I devised an adapter which had two bolts with oval heads which, when their nut was tightened, would rotate, jamming in the gap between bricks. Back then, I thought it would help to have the mounting surface at an angle, which explains the funny block on the front. The USB cable I ran along the brick gap, and stopped it falling out by cutting small bits of foam and wrapping them around the cable until it stuck in the gap.
This temporary installation lasted over six months, but it did ensure we knew what we were getting before making any holes in our house. (And in all that time, I never got a decent photo of it, so I’m having to make do with a screen grab from a video!)
Permanent installation
The temporary location was pretty satisfactory, so I finally got around to a permanent install in July. Given that there was a power outlet to run the door opener in the ceiling of the garage, the obvious solution was to run the USB cord through the wall and put the USB power brick on an extension cord run along the garage ceiling.
My first thought was to cut a USB cord, thread it through a small hole, re-join the two ends inside, and plug it into a USB power brick. Except my test join didn’t work; boy, those are tiny wires inside a USB cable! So I drilled a hole big enough for the smaller plug (camera end) on the cord to go through, and plugged the gaps afterwards. The only “trick” was using a long stiff piece of wire (it used to be a spring that stopped a microwave door from crashing down), which was thin enough to go through the hole in the brickwork and long enough to continue through the wood sheet inside.

After using a masonry drill for the brick, I sharpened one end of my long rod, and mounted it in the drill so it would pierce the OSB sheet inside. Then I knew where to drill a larger hole from inside the garage.
A regular masonry plug for the supplied screw to go into secured the camera mount to the wall.
Further from the plug – extension cord
The front camera was mounted close to a choice of two nice dry places where I could plug the USB power brick. When I installed the second camera in the back garden, there was an outdoor plug for powering a small waterfall pump, but too far from where I wanted the camera. So I got the power closer by running an extension cord up to get close enough. I protected the power brick by folding a fairly large sheet of heavy plastic stapled over it. That was in late March, so I wasn’t interested in a prolonged installation.
Further from the plug – longer USB cable
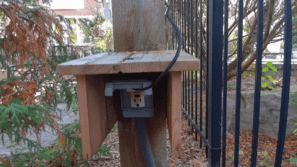
When the weather was better, I moved the power brick down to the outdoor power socket, and ran a 15’ USB cord up to the camera. Then I built a wooden “hood” to protect the plug from the worst of the weather.
Camera orientation
When choosing a location, you may have to try holding the camera in several places and looking at results before investing in a permanent installation. This also tests the quality of the Wi-Fi signal.
You will also need to line up the camera once it’s mounted. I forget if this is in the manual or whether I saw it on a YT video, but the best way to line things up is to look at the image in real time on a phone. Having someone else stand on the ground and shout instructions may be safer for the phone, but it’s much easier to see the effect of each movement in real time.
One tip I’d pass on is to keep the base of the camera close to parallel with the horizon. The further this is off, the more straight lines will appear curved, and the stranger the images will appear.
Camera performance
Picture quality depends on distance
The images are great. And they aren’t. Let me explain. 1080p used to be the gold standard for TV images. Even today, in the age of 4K screens or better, we don’t have a TV that exceeds 1080p in our house, and we don’t feel the need for one. (OK, I may lust after one, but I don’t need one!) That’s because human eye/brain combinations fill in lots of detail. We see a movie or even a nature program and it seems perfect. The V3 provides a 1080p image. By the way, that means there are 1,080 specks of light down the screen (and 1920 across the screen). The problem is, with a 110° angle of view, it covers a lot of territory. For comparison, a full frame 24mm wide angle lens covers only 84° and it would take something like a 15mm lens to cover the same scene as the V3.

So if you want to concentrate on a specific detail, like a license plate or a face, it is represented by very few specks of light (or pixels). A number plate half-way down the drive may be represented by way less than 30 pixels across. So while you can identify the make and colour of a car, for instance, you are probably fooling yourself if you think you can read the plate number.
Similarly, you can tell that there’s a package on the front step, but telling if it’s a sushi delivery or an Amazon box would probably depend on whether the sushi was delivered in a paper bag or white plastic.
Of course, that changes if the camera is mounted at eye (or licence plate) level some place where the subject was much closer to the camera. Then the portion of the picture being used to make an identification would be far higher and there would be plenty of information available.
So the camera location you choose depends on what you want you want to get out of the camera. My placement tells me when a parcel was delivered or when it was removed, but provides few details about the person who removed it. If I wanted facial recognition, I’d have to mount a camera close to the front door, preferably at eye level.
Service Performance
Notifications – implications for location
We ended up turning off notifications of Wyze events. I’m going to explain why.
Why the Wyze v3 thinks it saw a person
My interpretation of how notifications work is as follows:
- The camera itself checks to see if anything moved by comparing the image with a previous image every so often. I believe it only looks at the part of the image which I did not exclude using the detection zone. If something changed, it sends a copy of the video footage back to the Wyze servers. I believe it sends video starting a few seconds before the movement. It keeps sending until the movement stops, but maybe (probably) it stops earlier depending on your plan. If you have an SD card it seems to record the whole incident, or at least the moving parts of the incident.
- The Wyze servers analyse the entire frame, not just the detection zone. Depending on your plan it looks for different things, like people, pets, parcels or cars.
- Depending on your plan and settings it will then send a notification. Note that everything is at least “motion detected” because that was determined by the camera. Events that happen in the time immediately following the first event will only result in a notification if your plan covers that; the free plans have a “cooling down” period.
The critical part of this sequence is in step two. I excluded the sidewalk to avoid being told every time someone walked their dog past our place – although this was quite interesting for the first day. However, there is a street lamp across the road and this casts shadows once it’s dark. On wet days, there are reflections, even during the day. And cars coming around the bend sweep our driveway with their headlights. Even though the person is not in the detection zone, their shadow or reflection is; that counts as “movement” within the detection zone. When the event is analyzed, any person on the sidewalk gets found, because the detection zone is ignored. So we get a person notification, and lots of spurious movements even when the person wasn’t in the zone, regardless of how carefully we set it,
I’m sure about the result, even if my interpretation of what is happening is not correct. We got too many spurious events. The bend in the road, street light and even the direction of morning sunlight all conspired to make accurate interpretation impossible. It sounds like an outdoor camera might have been a better bet, because I believe it uses heat detection, and it wouldn’t be fooled by shadows or headlights.
That’s why we turned off notifications.
So be aware of these limitations when choosing your location. I think if I had a V3 camera located away from the house, pointing back at the driveway, these issues would all go away. But sadly, there is no power there. (In the back garden, we get fewer false notifications because there are no cars, no pedestrians and no sunrise. We get the occasional mourning dove flying by, lights turning on and off, waving branches and snow or rain events instead. But at least most of these don’t get interpreted as “Person”.)
Wi-Fi Reception
Here at least there is something that can be done. Putting a Wi-Fi access point upstairs in our house provided better reception in the back garden, and our recent upgrade to Mesh Wi-Fi has made everything more stable; we get far fewer occasions where it takes several tries to get a connection. However, there is still a requirement to locate the cameras within the Wi-Fi umbrella. Poor wi-fi makes the experience very frustrating.
SD card access
The last location consideration is getting at the SD card. For a quick look at a past event, scrolling through the recordings remotely and downloading a clip or two is very doable, especially if the Wi-Fi is good. If there is a lot to be accessed, I’d bring the SD card in and work with it directly, on a computer. I was never able to download a time-lapse recording, I had to use the card; but that was before the Wi-Fi upgrade. However, I can’t think of too many occasions where time-lapse would be entertaining – possibly (someone else) snow-shovelling after a big storm. Getting the SD card out and back in will probably require a ladder, and you will probably move the camera to access the card slot, so you have to go through process of standing on the ladder, leaning sideways to stay out of frame and looking at your phone while trying to work out which way to adjust the camera. And then you need to check the detection zone is still good.
Anyway, if you think you’ll often need card access, this might be a minor consideration.
Conclusion
For the price of two cameras, plus a couple of SD cards and a longer USB cord, we have video coverage of much of the back yard and the driveway and front steps. Several times, I’ve utilized footage from the cameras in a video or post I was making, and occasionally we’ve checked to see how the garbage can got moved (it was the newspaper delivery guy, and he checked to make sure there was no damage to our can). One time I mislaid something and by chance saw it, on video, on the roof of my car as it was leaving the garage. I was able to see it fall off across the road, and so I was able to retrieve it. Now that was pure luck, we don’t review every day’s events. We can see what time we left and when we came back. And my wife loves to look at the real time image to see if the courier has dropped off the package she’s waiting for. I’m looking forward to capturing video of cars who don’t slow for the bend in fresh snow and end up on our snowbank.
None of these are compelling reasons to install video cameras, but all together it’s nice to have, very entertaining and the price is right. I’d recommend these cameras to anyone who wants to see what they’re missing.

