

I have been using ACDSee to manage my photographs for longer than I can remember. I know I started using ACDSee when I was introduced to it sometime before 1998. Back in those days, it was freeware that made viewing a lot of photographs one after another a fairly painless task. I probably used the Corel Draw suite to actually edit photos. Doesn’t matter – I’ve used ACDSee forever, and it has become my only DAM tool and practically my only image editor. I’d say that 99% of my images that start in a camera are only processed in ACDSee.
The history above should tell you that the processes I’ve worked out work well for me. It doesn’t of course prove that the way I do it is the best way, just that it’s a way, and one that works. So the following might be a starting point for setting up your process, or there may be some steps that I’ll outline that might be added to your process – as-is or modified to suit.
I’m going to outline how I get photos from camera to disk, file naming, adding metadata like copyright, backing up, culling, cataloging (with a small detour regarding keywords vs. categories and open vs. proprietary) and finally, storing in a folder structure, Enough with the intro, let’s dive in.
From the cameras to the disks
I don’t change any defaults in my cameras with respect to file names, folders, or anything like that. As I’m not a professional photographer, I don’t take advantage of features like dual card slots for redundancy. Maybe if I ever do another wedding I might, but then I’d have to buy XQD cards or whatever they’re called. I know they cost an arm and a leg. For the record, I’ve never found the need to buy expensive SD cards, and most of my cards are in the 32 to 64GB range. I tend to download to my PC after each trip. I use a cable from the camera, I don’t take the SD card out of the camera, and I don’t often format the cards.
To import the images, I join the camera to my PC with the appropriate USB cable, and turn the camera on. In ACDSee | Manage, I go: Import | From Device, which brings up something like this:
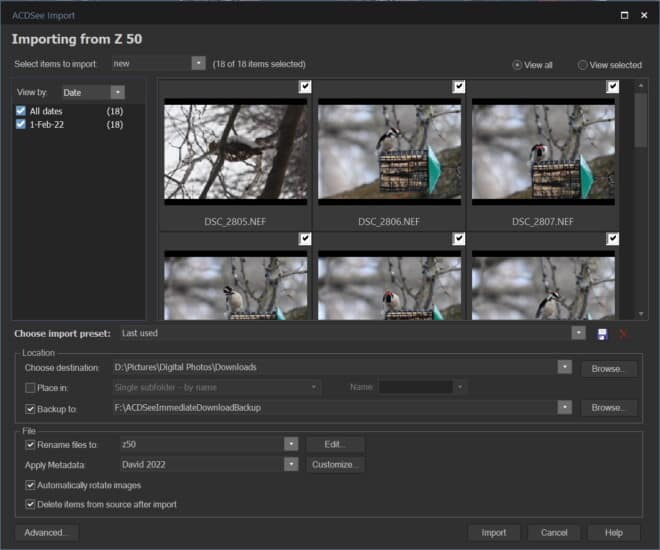
I always download into a folder called “Downloads” inside the Windows “Pictures” folder, which I have moved off the system C: drive (a relatively small SSD) onto my much bigger D: disk.
I always download everything, and delete the images on the camera. I’m OK with this because I tell ACDSee to make a copy on my F: disk (a smaller hard drive that I installed in the PC). Being on a physically different disk means that if D: fails, F: should survive. This copy also means that if I get too enthusiastic in culling photos, I can always go back to the backup.
In the file rename, I have one template for each camera, plus “phone”. I’d prefer not to have to choose a template manually (from the drop down) but if I use the EXIF data for camera model, I’d get something like “NIKON Z50” in the file name, which would make a long file name even longer, so my template just adds “Z50” in this case. Here’s the rename template dialog I use for the Z50:

The effect of this rename is to create a unique file name for each image, even if I was using two cameras on continuous shutter. Like this: 3-Feb-22 09-40-21 Z50 008.NEF. (It’s possible to get two images in the exact same second, or to have two camera operators take a photo at the same time., so the added index number avoids that.) Not that I ever really worried about this, but being an IT guy, I was trained to never assign the same key to two objects! I also find it useful to have the date and camera info exposed even when the file is outside ACDSee, or if the metadata has been stripped for privacy or whatever.
Side note: with the 2021 release of ACDSee, I realize I could exchange the task of switching templates for remembering to run a rename to change “NIKON Z50” to “Z50”, or, as I have mostly Nikon cameras, to just change “NIKON ” to “”. This would also save me the trouble of recreating the templates each time I install a new version of ACDSee, which I really resent!
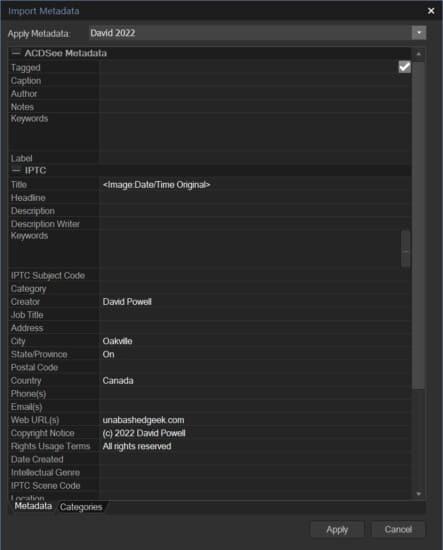
The last manipulation is to add metadata to each image. Once a year I have to remember to create a new metadata set so I can use a different copyright year. Here’s my Import Metadata dialog for 2022.
Incidentally, in options, I choose to set database date to EXIF – datetime original.
More backup Information
In my process, Immediately after each import, there are copies of each image on two different hard drives, and if push came to shove, a third copy on the SD card, which, although deleted, could be retrieved. However, with both copies in the same metal box (my PC) there is still an exposure to an electrical surge, physical damage, or theft. Once a week, I attach an external drive to back up my C: and D: drives, and once every six weeks I attach a different drive for a full backup, and this drive is stored in a fire safe away from the computer. Every day I do an incremental backup of my active files from D: to F: and the Download folder and the ACDSee catalog (database) are included in this, so that any ongoing edits are protected.
While I can certainly identify exposures that are not covered. I’m content with my balance of protection versus effort.
Culling
I’m not going to detail how I do this as I’ve written another post on the topic. [ACDSee workflow for choosing images to keep] I’m still trying to find the best process for this, and there are some tools in ACDSee that make this somewhat easier, but other tools I find lacking. My advice is to mark cull candidates in some way that allows you to hide them while you continue to look for more, and not to make the final decision (deletion!) until you have established that (a) you’re not deleting the only shot of that subject (especially for people at a gathering!) and (b) that you’re not deleting a decent shot that can be saved with some creative editing. The trick is to reduce the amount of time you spend developing pictures only to throw them away. However, lately I’ve been deleting perfectly good images just because I have another that is pretty much the same. I’ve stopped competing for the “who has the most photos on their hard-drive” cup.
Cataloging
In theory I’ll have rated, developed and possibly edited all the images at this point, but mostly there is a mix.
Here I use filtering to find any unrated images, and then rate them. I wish I could filter for unrated and NOT tagged, (currently I tag delete candidates) but I can’t so I have to finally decide on tagged images and either delete them or rate them.
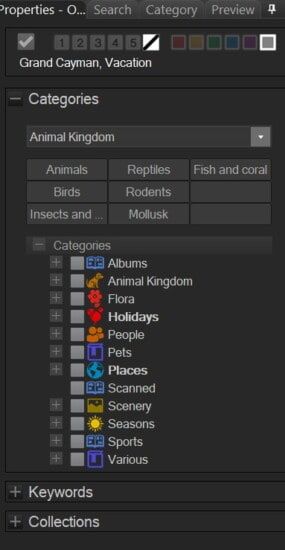
The last step is to add enough information to each image that I can find it again. To my mind, this is most important for photos with people in them. I could see that if my hobby was birding, I might want to be able to find all my photos of hawks, for instance, but I find that big general sets like: birds, animals, flowers, trees, snow and ice, Christmas, vacation, trips and gatherings work just fine. From time to time I will take a large set and break it down, like taking “My Sister’s family” and creating subsets for each sub family or even individual people.
In Manage mode, I can filter by Uncategorized (if I used keywords, I’d filter by “No keywords”) and Ctrl-click all the images of some category and select the category in the Organize pane. In 2022, I’m now experimenting with using Quick Categories where I can make “buttons” to assign some of my most used categories.
The only problem with this approach (filtering by uncategorized) is that it only guarantees I put at least one category on each image. If I want to add “Christmas” and “kid#1” on one image, I have to remember to do both. And by the way, the filter works when you first set it, and then only if you refresh (F5) – images don’t disappear as soon as you add a category. In practice, I probably select all “kid#1”, categorize; then “kid#2” and so on, then select all the Christmas, and so on. Photos with several kids get several categories. A lot depends on the situation.
Keywords vs. Categories
When I first started, nothing I read indicated any difference between using keywords and using Categories. As both were proprietary implementations (i.e. other photo-editing programs would not see that information), I arbitrarily chose to use Categories. I did experiment with using keywords as well. Vacation photographs had a “Vacation” category attached, and then I added a keyword for the location. However, sometime later, I manually converted the keywords to categories and sub-categories as in: Places | Vacation spots|<place>. I still have some keywords, I’m just too lazy to convert them.
ACDSee is beginning to treat keywords and Categories differently
Be warned, though, there are some indications that ACDSee is beginning to differentiate between keywords and categories. For instance, the new-in-2022 Media feature allows you to group by keyword, but NOT by category, so I can’t look at my Nature photos with any meaningful breakdown. In Manage mode, we can filter by no category or by category, but while we can filter for no keywords, there is no filter on keywords. (We can filter on a smart collection that specifies “keywords is heron”, for instance, but you need to set this up in advance, it’s not dynamic.) I also see that keywords come pre-populated with example values, while categories do not – actually, this is something I’m grateful for.
Proprietary vs. open
For the record, I don’t care that I’m locking myself in to one product. I don’t see the point in using a product for twenty-some years and carefully avoiding any feature that locks me in. It’s like buying an expensive camera and not buying any lenses, because then I’d be locked in. Besides, who wants to learn a complete new program?
However, there is an argument that if one is organizing photos for a client, then one should use an open protocol, like IPTC metadata.
Filing in Folders
My final step is to move each image to an appropriate folder. My approach to using folders is based on the following premises:
- While the folder a photo is in may help me in locating it, I should be able to find the photo even if I accidentally misfiled it, using date and category. A corollary of this is that (so long as I do so within ACDSee) I can move photos to other folders or rename folders or photos freely.
- Folders may be used to separate photos by function like social media, reference, artistic, or illustration for an article
- Folders may be used to separate ownership, with or without file permissions
- Folders with a reasonable number of files work better than gigantic folders.
- Folders can determine which photos I want ACDSee to catalog or ones I want to process with facial recognition.
I use folders and sub-folders. All of the folders that ACDSee catalogs are subfolders of Pictures, which as I said, I moved from the default location on the tiny SSD C: drive. For reasons lost in the mists of time, I put most of my photos in Pictures/Digital photos, as if they aren’t all digital – I should change that! Here are my major top-level folders:
Artsy Fartsy – pictures for the sake of photography
Blog post photos – the originals for posts, past or future, one sub folder per post, project or idea
Business related – self-explanatory
Downloads – the folder I download to and where I do all the initial processing
Events and trips – typically single day outings, or possibly someone coming to stay
For the record shots – reference photos, serial number on an appliance, that kind of thing
Gatherings – people photos; sub-folders for each family; folder for each Christmas
People and Pets – everyday photos, not from a gathering or trip
Sports – from when the kids did such things
Vacations – from when we used to do such things.
I also have a folder called “Collections Duplicated” which is where I put copies of the originals when I post to social media, print cards, make photo books, collages or anything where the photo is derived from another. These are typically jpg, not RAW, and in theory I could delete them and recreate them from the originals. In practice, there is nothing which records which originals I selected to post or print, unless I created an album, which I tend to do for “Best of 2021” or similar reasons.
How I move the photos depends on how many photos I have accumulated. I might just ctrl-click on thumbnails in Manage mode and drag to folders, or I may filter by a category, select all and move to a folder. For instance, I have a “Bird” category and a “Bird” folder, so that’s an easy way to collect them all.
As I write this, I came to realize that some information is captured in the folder collection. For instance the location, like in the “Toronto Zoo Sept 2017” folder – I can determine the 2017 part, but an individual photo separated from the folder would lose the information that it was taken at the Toronto Zoo. I could very easily remedy this by adding a “Toronto Zoo” category under “Places”. I’m building a process, not a rule book!
Conclusion
I wrote this because a number of people on the ACDSee FB group were asking how others used the DAM features of ACDSee Photo Studio Ultimate, and I thought my post would help them. In practice, I found that documenting my process identified some areas for improvement, so that was useful. Writing this post also gave me the impetus to research something that I’ve been suspecting for some time, which is that the design of ACDSee features is no longer consistent. Things that are possible in one area (like categories, or filters) are not implemented the same way in other areas (like keywords, or selection). Enough so that I feel another post coming in the future!
Newsflash: I have just posted my article on changes I consider necessary for ACDSee DAM features. Check out “ACDSee DAM changes I’d like to see“


2 Responses to “Digital Asset Management in ACDSee”
Interesting reading. Thanks for sharing. /Mike
Thank you for the feedback.